Thursday, December 30, 2010

December 31st -Tangerine Orange Roughy

The Orange Crush

     Happy new years eve. This will likely be my last post until the new year. And...wow.
     I couldn't have wished for a better dish to end the year on. It was possibly the best thing I've ever eaten. Definitely a good omen.

      The fish sale at my local store was still going on today, and walking past it I saw Orange Roughy. I'd never actually eaten it before but it's been something Ive wanted to try for a long time.Without hesitation I bought a bunch.
     I decided I wanted to use one of my favorite techniques for fish. it's a marinate with honey, a little salt, and  a fruit that goes well with your chosen fish. It's similar to a swordfish recipe I will post eventually.
     I didn't really know what went well with orange roughy, but stubbornly I picked oranges. the irony was irresistible.
     Technically I used tangerines, and some red pepper flakes. the result was perfect! I really cant describe it. Moist, tender, exploding with flavor.
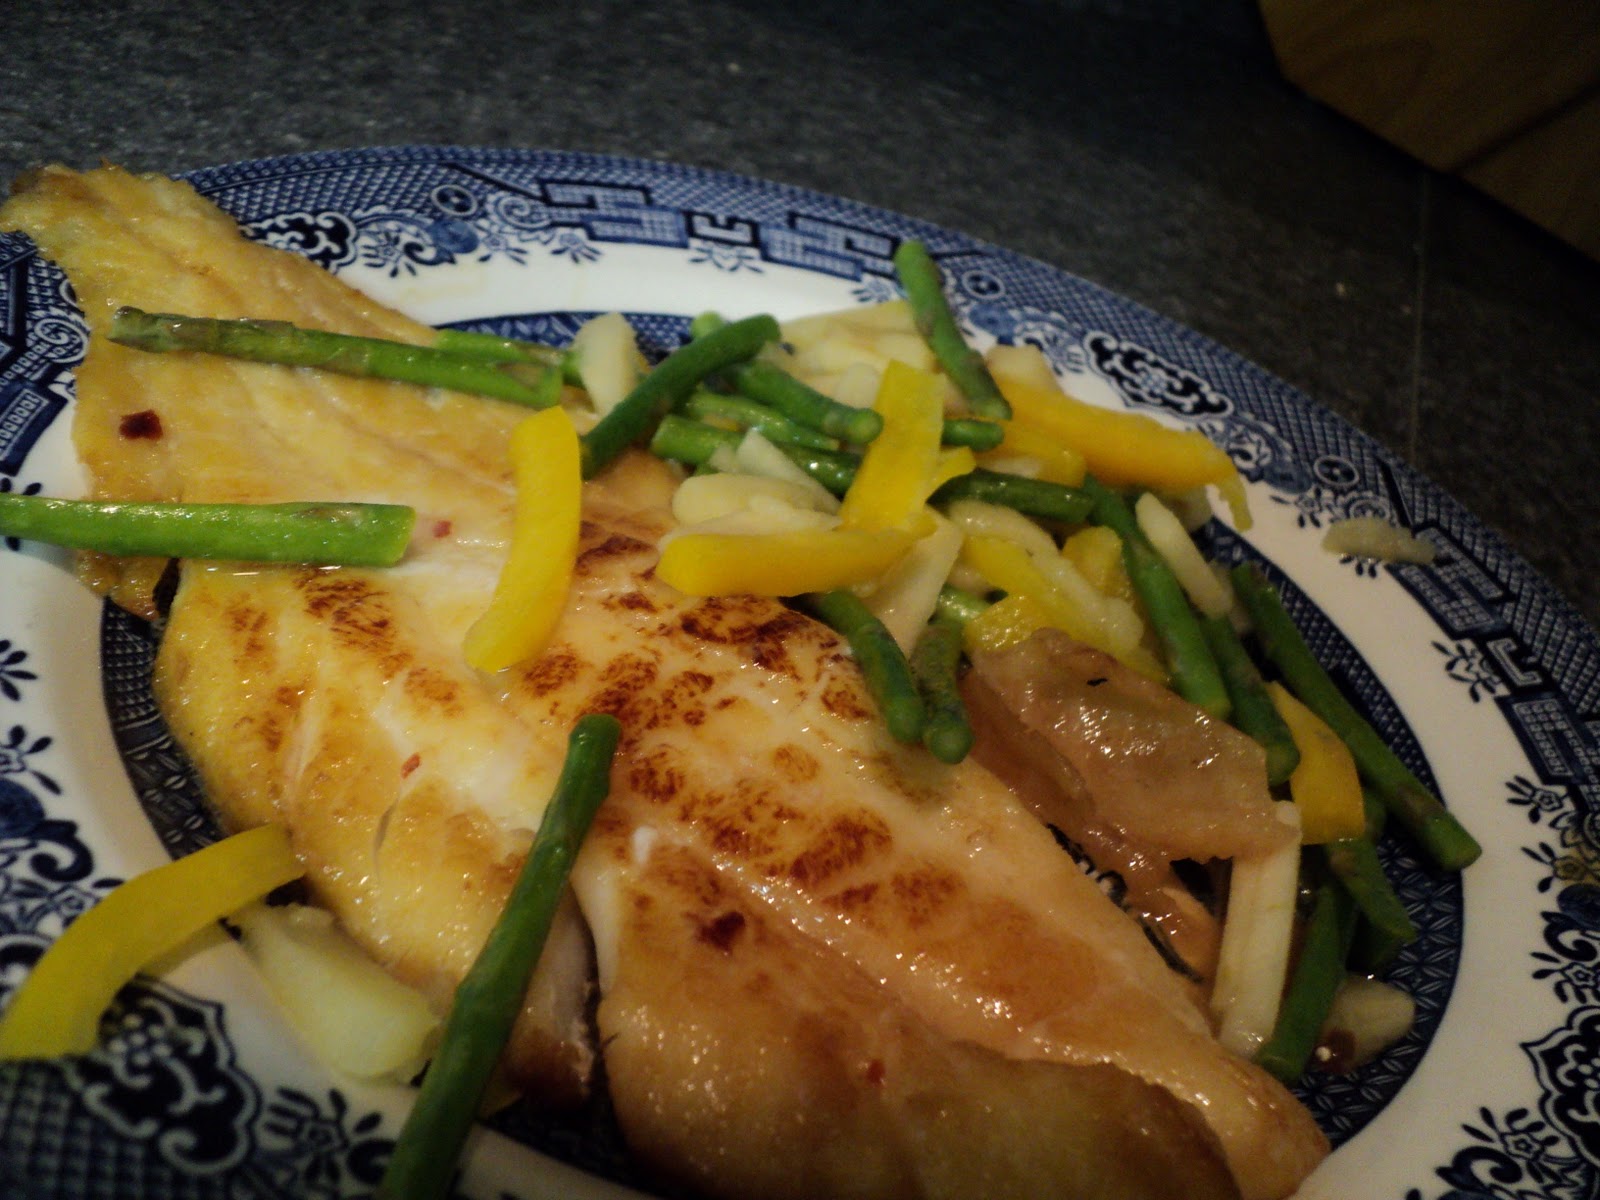
     I added a asparagus stick...salad? It led well into the main course and looked amazing to boot.

Here's what you'll need!

The Fish:
1 lb Orange roughy (2 fillets if possible)
2 Tangerines Sliced
1/2 cup honey
1/4th tsp salt
a few dashes red pepper flakes (or more depending on how hot you like it.)

The Salad:
3/4ths cup Asparagus (thin and just the middles)
3/4th cup Yellow bell pepper (cut into sticks)
3/4ths cup Red apple (cut into sticks) ( a pineapple may be a better choice )
Splash of Coconut juice
1/3rd lemon

     Remember, this recipe is a marinate. You need to start it several hours before you're planning to serve it.

Lets get cooking!

     Place your orange roughy into a gallon bag, and add to it your tangerines, honey, salt, and pepper flakes. Push all the air from the bag and seal. Put it away in the fridge for at least 6 hours. Overnight would probably be better.
     Once the fish has marinated, there isn't any reason to be fancy. It has absorbed all the flavor it will ever need to. Pan fry it on high or medium-high with a little oil for a few minutes on both sides, and place it in the oven at 350 until a fork slides easily through its thickest part.

     For the salad, put the asparagus into a hot pan and saute it in a little oil for a few seconds. Add your coconut oil, and in 20 seconds add everything else. Saute for a minute and strain.
     Plate them both and serve.

     Orange roughy is definitely one of the best fish I've ever had. second only to swordfish.

     If you get the chance to buy some, don't pass it up. even if its pricey.

December 30th- Ultimate Seaweed Soup

     First and foremost I appologize for taking nearly an entire week to post. I wanted to post two days ago but I had computer trouble. It probably wont happen again in the near future.

     Soups are so often overlooked. It's not a main course and not quite as refreshing as a salad for an appetizer. But if made right, there's nothing that packs more flavor than a well built soup.
     Though I won't lie. Originally this recipe was never supposed to become a soup. I was making a broth for my steak fried quinoa, but I made the flavors to strong. It would have made my dish far to potent to eat easily, though not essentially bad tasting.
     But I'm not ashamed of a little botch in the kitchen as long as I can turn it into something equally as good. I think it's one of the things that defines a good cook. Sometimes you need to be able to bend without breaking.

     When I served this to my girlfriend, I didn't think I would be posting this recipe on the site. I have a bad habbit of looking down on soup when it really is a great food.
     In the end I'm glad she made me agree to post it. And from now on I'll try to pay more  attention to soup in general.
     The real key here is the seaweed. When added to a soup it just about doubles the flavor. I use it in all of my soups even if it's just to dip briefly and throw away.

Here's what you'll need!

5 cups water
.75 lb sirloin steak
2 tbsp Oil (I used sunflower)
2-3 scallions (cut in half)
1/4th cup White Onion
2 cloves garlic (crushed)
4 small dried shiitake mushrooms
1/3rd cubanelle pepper
1/2 tbsp salt
Several sheets of seaweed ( One for each bowl)

     The reason I call this 'Ultimate' Seaweed soup is the amount of work I put into the broth for such a simple outcome. Luxurious is a good word to describe it.
     By the way I don't expect everyone to go buy a  steak in order to make a broth. Go ahead and use bones or gristle, but come on guys, no bullion cubes. that's just taking the easy way out and it doesn't taste as good.
     If you want to make the soup bigger, you can probably add 2 cups of water without changing the flavor to much. but if you add any more than that you may want to increase the other ingredients as well.

Lets get cooking!

     Once you figure out what you're going to use for your soup, the actual process of making it isn't difficult at all.
      Add your water to a large pot and bring it to a boil. Add in all of your ingredients, in the order listed or all at once.  Let boil for 5 minute then reduce to a simmer. Let simmer covered for at least an hour.

     Now strain out your vegetables and meat, and pour your broth into bowls. Just before serving, rip up a sheet of seaweed into each one and give it a quick mix to get all of the seaweed under.
     That's really all. It isn't any more filling than a soup normally is, but its a very satisfying soup and definitely worth making for those cold winter nights.

Thursday, December 23, 2010

December 24th- Holiday Beef Jerky

     This may be one of my weirdest recipes currently. Nearly everyone who's heard this recipe has told me to keep it away. But the lucky few who tried it quite enjoyed it.
     This is far from the traditional beef jerky. In fact, I don't even want you to think of it as beef jerky while your making and eating it. Think of this dish as...a cookie.
     It's slightly crunchy, sweet like a Christmas dessert in all of its cinnamon and sugary goodness.
     I make this but once a year, to bring to my grandma's christmas dinner.

Here's what you'll need!
 
2 lbs Beef- London Broil
2/3rds cup Brown sugar
2 tbsp Cinnimon
2/3rds tsp salt
Water
More cinnimon and sugar
2/3rds cup Oil ( I used sunflower oil )

     Lots of cinnimon, lots of sugar. Like I said, this is more like a cookie.

Lets get cooking!

     Start by placing your london broil into the freezer. Leave it sit for aproximately 40 minutes. It wont freeze, but it will become stiffer, and will be much easier to cut preciesely.
      Cut the meat into thin strips, most people suggest staying against the grain, I never payed to much attention to that. Sometimes I will, and sometimes I wont.
     Next put the meat in a 1 or 2 gallon plastic bag, and fill it up with water so it just barely covers the meat.
     Add in your brown sugar, salt, cinnamon, and half of your oil. Shake and mix the meat well, squeese all the air you can out of the bag and let it rest in your fridge overnight.

     Go to bed, go to work, do whatever you need to do for at least 12 hours. this stuff needs time to suck in flavor.

     Alright, get back down to business, lay out a long line of paper towels on your counter and spread your jerky over them.
     When all your meat is laid out, make a cinnamon and brown sugar mixture of 1 part cinnamon to 2 parts sugar. Give your jerky a quick dusting of the stuff and begin dehydrating.
     Each dehydrator has its own time. Mine is very old and takes about 12 hours to dehydrate 2 lbs. My friend has one that takes 4 hours.
     Just dehydrate until you get good leathery jerky.

     Give it a try. if it's sweet enough for you now, you can eat as is. If not, I've got one more step for you.

     In a small saucepan, heat on med-low and add the rest of your oil. 1/2 cup brown sugar, a tbsp cinnamon, and enough water to just barely dissolve the sugar into a semi-thick sauce.
     mix your jerky with enough of your sugar mixture to coat them lightly, and you've got my holiday jerky.
     Merry Christmas everybody! If I don't see you sooner!

December 24th- Mini Vegetable Sandwiches

     Like...literally vegetable sandwiches...as literal as you can be with that word.
Why?....
     Yea, I know, its weird. I don't usually go for foods that say cute or witty.
     My girlfriend needed hor d'ourves whipped up for a celebration at her friend's house. I got put on duty for that, and it had to be practically allergen free...wow...
     So lets see, no cheese, no bread, no soy, no cream, bo nuts...and she didn't want eggs in them either. That's like everything that appitizers are.
     I'll admit, these aren't perfect, but they are very munchable little things. and not to mention exceedingly healthy and low calorie.
     The presentation was done on a paper plate, I didnt want to set up the display twice.
Smooth, right?

Here's what you'll need!

A handful of baby carrots
A handfull of cherry tomatoes
A handful of lettuce
And a bunch of fancy toothpicks.

     Obviously this was more about show than deep deep flavors. Visual is important to though, sometimes.

Lets Get Cooking!

     Cut the carrots in half long ways, then short ways.
     Quarter your tomatoes, and chop your lettuce.
     Start making little submarine sandwiches. Carrot, tomato, lettuce, carrot, sticking them with the toothpicks.

     If you get a group full of people to devour something made fully of vegetables, you know its got to both look good and taste good.
     If you want some more flavors, try dipping them in your favorite dressing and treating them like little salad sticks.
     They didn't quite clear the plate, but not to many made it back to me.
 

.

Sunday, December 19, 2010

December 19th- Boricua House

Great food...

Great people...
And something new every week.
     All of these things make up my favorite restaurant, the Boricua house of Shenandoah Pennsylvania.

     On my first post I told you all that I would eventually get into who I am and what I like to do. Today is the day I start to make good on that promise. And to start I thought I would show you all my favorite place to eat in the entire world.
     The Boricua House is a restaurant with amazing Caribbean food. I've gone nearly every week since I discovered it and don't plan to stop any time soon.  The owners are almost as close as family to me, and the strangest thing is I found this place completely by accident.
     I was going to the mall with a group of friends and we missed the bus. On the walk home we passed this by, I thought it looked interesting and by the next day I was hooked.
     If you're hungry and want food fast, they will alwaya have something prepared. Empanadas, stuffed potato balls, half chickens.  You really wont go wrong with anything on the menu. They've also got an array of giant pressed sandwiches and burgers far bigger than a fist. But you'll have to wait for them to be cooked fresh from scratch. Some with surprisingly exotic ingredients.

     Boricua house is small but lively! On Saturdays I'm often invited to play dominoes with the owner and friends after closing, almost until sunrise.
     I guess the point is, great food brings together great people. And the Boricua house is a perfect example. 
     The Boricua house will be one of the main reasons that I will eventually attend a Culinary college, and possibly even open up my own restaurant one day. I owe a lot to these guys just for treating me like such a close friend. 
     It often seems like Bori, the owner, expects a lot out of me as a cook. And that is one of the things that push me to make new variations on recipes every week. 
     Maybe one day we can even clash cooking knives and have a match. But Ive got some work to do before then.
     Cheers to the seemingly random encounters in life that all lead to something greater. Never pass up the opportunity to stop into some small shop that you just happen to glance at.
     You never know what you might find.

Friday, December 17, 2010

December 17th- Calamari Pasta


     To my surprise, there was a big seafood sale at my local grocery store two days ago. They had a lot of things they didn't usually have, and so I felt like I needed to do at least one dish including a sea creature I usually won't be able to find.
     Lobster was to expensive this week, and snow-crab though absolutely delicious, well, I've cooked it before. which I cannot say for Calamari. My first idea was to stuff, then fry, then bake the squid, but in the end I realized it's been forever since I've had pasta.

     As a kid with an italian grandmother, I was practically raised on pasta. If I had to I could eat it 3 times a day for the rest of my life and I doubt I would complain all that much.
     I prepared a piece of Calamari before hand, to taste, and found it doesn't give up much flavor all on its own. Not to say its bland, but rather subtle. I had originally planned to make the pasta to match the Calamari, but in the end I decided instead to make the Calamari to match the pasta.
     Slightly cheesy, hints of garlic in each bite, and the occasional tomato kick made this dish one of my favorites to date. When subtle italian flavors meet the sea, this is what you'll find.

     The first few people that tried this pasta told me it wasn't moist enough, and needed more olive oil. To tell you all the truth, I was stunned. To me this dish is pasta at its very finest, but maybe my tastes are a bit dry compared to average. If that is your taste, please don't let me recipe stop you from adding some extra olive oil to please your pallet.
     But if you would be so kind...Try it my way first.

Here's what you'll need!

3 Cups Calamari
16 oz Spaghetti noodles
3/4ths tsp Cracked pepper
3 cloves Garlic
1/2 cup (plus more for sauteing) extra virgin olive oil
1 tsp Dried Basil (You may want to try it with half of a tsp first. )
1/3rd cup Red onion (small, thin slices)
1/2 cup cherry tomatoes (Halved)
1/2 cup Parmesan/Romano (I found a mix containing both.)
1 1/2 tbsp Butter
salt to taste

     No sauce? You are completely correct. instead of sauce I made some garlic oil to drizzle over the pasta. The name of this recipe is great taste with great subtlety. That is very difficult with the heavy zest of tomato sauce.

Lets get cooking!

     First prepare your pasta as your package instructs you. I like to add olive oil and salt to the water. If you've got any decent knife skills you should easily be able to finish the rest of your prep before the spaghetti finishes.

     Cut your Calamari into rings, chop your garlic, your onion, tomatoes, and measure out the rest of your ingredients.
     In a small pan, pour in your 1/2 cup of oil and heat on low. Add 2 of your chopped garlic cloves. 1/2 tbsp of butter, and a dash of salt. let simmer. Stir occasionally and give it a break if you see it begin to boil but you want to keep it on the heat through most of this recipe.

     Strain your pasta and set it aside somewhere it will stay warm. Keep that burner on high and switch your pasta pot for a frying pan. Drizzle the pan lightly with olive oil and  Add your Calamari ( Do not crowd the pan. You can cook it in 2, even 3 batches if you need to. just divide up the ingredients. ) Add your pepper and butter and a tiny sprinkle of salt. saute on high until the Calamari is ready to eat.
     Now it gets easy. Take your pasta and add the Calamari, Cherry Tomatoes, Basil, Red Onion, 1 clove of diced garlic, cheese, salt to taste, and 4 tbsp of your garlic oil. Toss and mix very well, make sure everything is distributed as evenly as you can.
     The Calamari may make this difficult, but keep mixing and it will all come together in a few minutes.
     Plate the pasta and serve with a loaf of Italian bread if you've got it on hand. Just plain is fine to.
      But I really suggest the Italian bread. Yum.

Tuesday, December 14, 2010

December 14th- Boilo


     Ah, Boilo... A delicious coal region beverage that most of you guys have probably never heard of.
     In fact the coal region is pact with tons of its own food and drinks that are completely delicious yet scarcely known to the rest of the world. Today however, this will be the only one making an appearance.

     Every year when the weather gets cold and the townspeople begin to shiver, This drink is brought forth in hundreds, if not thousands of  varieties. To be sipped on cold nights, to share with friends by the bottle, some say a shot or two before bed will even cure a cold.
     I don't think anyone knows exactly how Boilo got started, but I doubt there is a single adult in my county who doesn't know how to make it.
     cherry boilo, apple boilo, blueberry, strawberry, and many more are made every year. But today I made mine traditional...Well, my version of Traditional.
     Boilo has no set recipe, and this is mine. But before you begin, there are two things you must know.
1. You drink Boilo hot. heating your drink up will times its flavor by ten.
2. If you do not like the taste of whiskey, you will want to make some changes to this recipe before you'll even want to go near it. My boilo is especially strong on the whiskey compared to most recipes.
-Here are a few things you can do to fix this.
     You can cut the whiskey in my recipe down to half, but I wouldn't go any lower than that.
     You can replace the whiskey with a 5th of pure grain alcohol. It will get rid of the alcohol taste almost all together.
     I think I've covered everything I need to.

Here's what you'll need!

2 5ths Whiskey ( It doesn't need to be expensive. I use 4 queens. )
4 Oranges
4 Lemons
2 packs Raisins
2 liters Ginger ale
24 oz Honey
1 1/2 tsp Cinnamon
5 Cinnamon Sticks

     Many Boilos taste like pure honey, or pure Cinnamon. Some like pure orange juice. This recipe, in my opinion, brings out equal parts of all ingredients. And the whiskey strengthens them.

Lets get cooking!

     First begin by bringing your ginger ale to a boil in a large pot.
     Cut your oranges into 16ths, your lemons into 8ths. Squeeze the juice into your ginger ale, then toss in the rest, peels and all. Mix well.
     Add your raisins, honey, and cinnamon. Mix again and continue to boil for about 8 minutes.
     Finally, take your pot off the burner and after 5 minutes add in your alcohol And don't be shy with it.

     Any that's pretty much it. You're finished. This recipe yields 5 delicious fifths. Just strain  out the bigger pieces and fill up your favorite bottles or jars. Add one cinnamon stick to each bottle.
     Now it's time to share. Don't be stingy. Traditionally the maker of the boilo will hand out jars to all his friends, keeping only one bottle for himself.
     Also traditionally, the maker will soon receive a jar of boilo from each one of his friends as well. But it's just never quite as good as your own.

     Well....there's nothing wrong with being a little stingy. Keep a second bottle in the closet and save it for next year. It will only get better with age.

Saturday, December 11, 2010

December 11th - Parsnip Encrusted Tilapia


     I've had this recipe going on in my head for a few days, though it wasn't until last night that I found the time to make it. The way this dish looks reminds me of a classic meal, and cooking something like that was strange to me.
     I rarely cook whole fillets of steak, fish, or anything really. Even when I buy a delicious Delmonico steak, my first thought is usually slicing it thin and making cheese-steak out of it.
     Whole fillet  dishes have great importance in the culinary world, however. and despite how I think they can be a bit dull at times, doesn't mean I shouldn't learn to cook them and -make- them interesting and delicious.
     The fish when breaded with my parsnip blend tastes almost like its been drizzled with coconut milk. The flavor is very mellow and complimented to its very extremes by a squeeze of lemon. It's only weakness is the pancake factor.

     What is the pancake factor? Have you ever noticed when you eat pancakes that they just soak up the syrup? and somehow as they eat up that syrup, and the flavor doesn't necessarily stay syrupy. And so you have to add more...and more...Well, this fish will do that with lemon.
     Which is why instead of the traditional lemon squeeze over top, I suggest a dipping cup of lemon juice to dip each bite right before eating for maximum flavor.

     This dish makes a large meal for 2. But fish has never filled me up for very long so I'm reluctant to tell you to call over a third guest without changing the proportions.

Here's what you'll need!!

3 Fillets Tilapia ( or 1 lb, depending on the size of the fish. )
4 tbsp Parsnip powder (You will likely need to make this yourself. instructions will follow shortly)
2 tbsp Tapioca flour
1 Dash paprika
1 Dash salt
2 egg whites
1/2 cup baby carrots (halved)
1 stalk of baby Bok Choy
3-5 green onions
Lemon juice to taste

     Before we get cooking, I'll instruct you on making Parsnip Powder.
     Take one large parsnip and peel it, wasting as little of the actual parsnip as possible while getting rid of its peel.
     Now begin to cut thin strips from it as if you were still peeling it. Don't break down the entire thing, the core of the parsnip has a different flavor than its mantle. A bit of the core wont hurt but try for mostly the softer middle ground between crust and center.
     Once you've got that done, spread the strips out in the dehydrator and turn it on. Parsnips are naturally kind of dry so it likely wont take you more than 6 hours to dry it completely.
     Once it cracks instead of bends, you're ready to grind it into powder. Use a spice grinder or if you want a course crust, just use a hammer or blunt object to smash the parsnip into consistency.
     Now that we've got all of our ingredients...

Lets get cooking!

Breading the fish-
     First beat your egg whites with a whisk or fork until they begin to froth slightly.
     On a plate, mix together your parsnip powder, tapioca flour, paprika, and salt.
     Dip your fish into the egg whites and then into the parsnip breading you've just made. coat both sides.
     Turn two burners to high. on one of them place a pot full of water for boiling Bok Choy. On the second place a pan and fill it a 4th inch with the oil of your choice. I used sunflower.

     Cooking the Bok Choy-
     Boil the Bok Choy for several minutes, only until its color becomes slightly more vibrant. then quickly strain it and dump it into a bowl of very cold water to stop the cooking process from going any further.

     Cooking the fish-
     Seer the fish to a dark amber color on both sides, half at a time. Once the fish has achieved that color it will still be somewhat uncooked on the inside. Place it in a toaster oven at 350 degrees for 3 to 5 minutes. when a fork glides easily through it, your fish is finished.

     Putting it all together-
     Gather up all your vegetables and give them a quick stir fry on your highest heat in a fresh pan drizzles with just a bit of sesame oil and lemon juice. Do not exceed 60 seconds with this step. As a matter of fact 40 should be fine. You do not want to lose the fresh crunch of your vegetables.
     Pour the vegetables over the fish and serve. Don't forget your lemon juice to dip!

     As an after thought, you may want to throw in a 4th to 1/2 cup of sliced water chestnuts. But don't forget to stir-fry those as well.

Friday, December 10, 2010

December 10th - Vanilla and Poppy Seed Ice-Cream


     It snowed out today. So it was probably strange that I got the sudden urge to make ice-cream.
     That didn't even come close to stopping me. It did, however, make me think nostalgically about when I was a kid, and often complained that there were no ice-cream trucks in winter.
     I can see now why it wouldn't sell. but back then, good food was good food despite any temperature clashing. It really didn't matter. Frozen treats are always the best treats, and if we had a winter ice-cream truck, to this day  I would wait on the curb for a scoop or two at least once a week.

    My friend and I took some time arguing over what the best ice-cream to make would be. We threw some pretty good ideas back and forth. Ideas that you will definitely see some time in the future.
     Carrot cake, Pumpkin pie, eggnog n' Rum...But as I had never made ice cream to date, I wanted something unique, yet simple. I wanted something you don't see very often, but stays true to the classic feel of ice-cream.

     I chose poppy seeds and vanilla. The flavor is dominantly vanilla but the texture offered by the poppy seeds is what really makes me love it. the little crunches make an ice-cream that is literally fun to eat. Still, next time I make this, I think I want to attempt making a poppy seed paste and halving the vanilla to see what I get.
     Before I begin, I must say that I had a lot of fun making this, though it was probably the easiest thing I'll ever write about on this site. And it will definitely not be the last ice-cream you see here.

Here's what you'll need!

3 cups Half n' Half
3/4th cup sugar
6 egg yolks
3 tbsp poppy seeds
1 tbsp vanilla extract

     Easy short recipe. The instructions are only slightly harder. You can even have your kids help. What kind of kids don't love making their own ice-cream?
     There's not much more to say, so...

Lets Get Cooking!!

     Begin by pouring half of your half n' half into a small to medium pot and heating it at medium high. Add half of your sugar and stir to dissolve.
     In the mean time, in a bowl, whisk 6 egg yolks until smooth, then add the other half of your sugar to them and whisk smooth again.
     Once your half n' half reaches the point where it's just barely boiling (all you want to see are little bubbles forming on the sides. waiting for a rolling boil is a bad idea!! ) Take the pot off the heat immediately and let the mixture cool for 5 minutes.
     Go ahead now and add your poppy seeds and vanilla extract, stirring just a few times.

     Though the next step isn't hard, you need to do it carefully or you will have scrambled eggs in your ice-cream. You must temper the yolks.
     To temper the yolks, you must ladle the half n' half slowly into your egg yolks, whisking constantly. If you do it quickly the eggs will begin to cook! just take your good ole time.
     Once you get about half of your milk mixture into the eggs you can go ahead and just pour the rest in normally. It should be fine.
     - Side note- Tempering slowly raises the temperature of the yolk, and therefore warms it slowly, stopping it from becoming an omelet. 

     Add the rest of the cream now, and chill in the fridge over night ( or at least 6 hours. )
     When the time comes, just pour it into your handy ice-cream machine and let your instruction manual take it from there.
...what? No ice cream maker? No problem.

We can fix this!

you need-
2 cans with lids, one that can easily fit inside another.
Ice- Enough to fill the larger can with the smaller one inside
Rock salt- Just  a small hand full will do the trick.
Your ice-cream mixture.

     Fill the small can with your mixture, half way to 3/4ths should be fine. Lid it and place it in the larger can, add your ice and salt to the large can, then lid it and play catch with it for 10-15 minutes. open it up and serve. (This sounds more fun than how I did it, honestly. I want to try it this way some time soon. )

     The ice-cream maker I used, was accidentally a soft-serve machine, which was not what I wanted.
     If you've got this same problem, simply freeze your soft serve product for 2 or 3 hours, (if not fully frozen when soft, the egg yolks may separate from the ice-cream) just mix with a fork and place it back into the freezer.
     With that said, Enjoy your frozen treat!

Wednesday, December 8, 2010

December 8th- Beef Stew


     If I have a main weakness in cooking, it is undoubtedly stew. I chose to cook it today to improve on my usual sub par stews, and to a point, I was met with success!
     If I could change one thing it would be that this stew did not come out thick enough. I wanted to make a roux from tapioca flour to thicken it but when I noticed I was all out, it was to late to turn back. You may want to add a cup or two less water than me.
     Or not. The broth is tasty enough to drink up after the meal to.

   This meal is great to take with you to work in a hot thermos, it really warms the soul when it gets below freezing and it tastes twice as good after a night in the fridge.
   Usually  I write more, but as I've just woken up...
Here's what you'll need!!

8 Cups Water
2 packages Dried Shiitake Mushrooms ( about 10 small mushroom caps )
1 1/2 cup gristle and meat ( usually I save whatever I cut off of steak from the night before. )
Salt to taste ( I probably used about a 6th of a cup. maybe more.)
3/4th cups leeks (julienne) 
1/2 cup green onions (Diced, greens and all. )
1 clove elephant garlic (or 3 to 4 cloves regular garlic )
2-3 medium potatoes (Sliced into thin circles )
Sunflower oil
2 lbs meat for stew (cubed)
1/2 White Onion (chopped)
2 stalks of baby Bok Choy 
Dash of ginger powder

     All in all I like the ratio of ingredients. They offered an American tasting beef stew while a few of the oriental vegetables gave it a slightly lighter feeling.
     Ok lets begin. like many of my recipes, this one  has a few steps. as I wont just ask you to go out and buy beef  stock or bullion cubes.
     On one last note...feel free to add 3 lbs of meat to the stew instead of 2. I think it would be better.
Lets Get Cooking!!

Make the Broth!

     First add the water, 8 cups into a large cooking pot on medium-high. Let it come to a boil. Then add all of your Shiitake Mushrooms and your 1 1/2 cups gristle. Don't worry, we're taking it out after it gives up its flavors to our broth. Add your salt and cover the pot. 
     Cover your pot and let simmer on low heat for a half hour to 45 minutes.

Add the Veggies!

     Not difficult, though not as simple as implied above. Gather together your leeks, green onions, 3/4ths of your garlic,  and your potatoes.  chop them up and throw everything but the potatoes in a lightly oiled pan. Saute them for about 40 seconds.
     Add in your potatoes and saute them for another 30 seconds. take them off the burner, and out of the pan completely for that matter. You don't want to burn them.
     Take the gristle out of your pot, but leave the mushrooms. Instantly add the veggies and stir. Let simmer for at least 30 minutes.

     Add the Meat!

     The most important step, if you ask me.
     Start by giving your meat a seer in some oil, accompanied by the rest of your garlic. Once its gotten a nice seer to it, throw in the rest of your onions and a dash of ginger powder. cook until onions are soft and then add it all to the pot. taste the broth and salt again if needed.

     Finish the Stew!
     Simmer for 20 minutes uncovered, then chop and add your Bok choy. simmer for another 20 uncovered. Ladle into your favorite soup bowl and enjoy!
      If I had a restaurant, would I serve this?
     only the next day. it thickened up into a beautiful stew after about 16 hours.

Thursday, December 2, 2010

December 2nd- Hawaiian Style Chinese Dumplings

     When you bite into a Chinese dumpling, aka Pot sticker, the last thing you expect is the bang of ham, pineapple, and cheddar cheese! Though the reactions people gave me upon trying it said that it was anything but unpleasant.

     I've been rolling this recipe around in my head for nearly a month now, and I decided today would be the day that I finally tried it.
     I LOVE making dumplings. it's a lot of work and takes a long time but something about it keeps dragging me back. Crafting every single one right down to the dough has a way of making you care that every single one gets eaten and appreciated to its fullest.

     This batch of dumplings was extra large because I felt that the filling being so much more American, needed a bigger bite. I made them twice the size of your average dumpling and about 2 or 3 alone make a satisfying meal.
     I almost used American cheese, figuring it would blend well with the other ingredients, but I opted for a sharp cheddar that would stand out instead.
     This recipe makes 18 of them. But be sure to make a little extra filling just in case.

Here's what you'll need!

Dumpling dough-
3 cups all purpose flour
1 1/2 cups just boiled water (cool for about 2 minutes)
1 egg yolk
Filling-
1 1/2 cup ham, chopped small
1 1/2 cup pineapple, also chopped small.
3/4ths cup sharp cheddar cheese, chopped small
18 spinach leaves
Other-
Olive oil or Sesame Oil
Black cracked pepper

If you don't have them, you may also want to invest in a rolling pin, a dough cutter, and a steamer of some sort. I just use a strainer over a pan of water.
Alright.

Lets get cooking!

Make the skin-
      First comes the dough. Boil you water and put your flour in a bowl. Once the water is boiling, take it off of the burner and let cool for about 2 minutes.
     Add the water and egg yolk to your flour and mix it into a dough. You'll likely need to use more flour than I listed. Just keep adding more as you knead until you get a nice soft dough that doesn't stick to your counter or hands... Which should also both be well floured, by the way.

Make the filling-
      Set the dough aside in a covered bowl, and in wok or pan mix your ham, cheese, and pineapple. Stir under low heat until the cheese begins to melt.
     Take the filling off of the burner and set aside and Take your dough back out.

Make the dumpling!-
      Knead the dough briefly and add a bit more flour only if needed. Cut the dough into 3 pieces, then cut those in half. and then cut THOSE into 3 pieces. You will end up with 18 medium sized dough balls. Try your best to cut evenly! (If you want to make traditionally sized dumplings, cut all of those in half one more time.)
      On a surface that should still be well floured and kept that way, form the balls into circles, squish them down your your hand. then roll them flat with a rolling pin. They will get pretty big once they are flattened out. do your best to keep them in a round shape.
      Once all your dough balls have become dumpling sheets, take out your spinach and lay one leaf (slightly smaller than half of the dumpling sheet ) on one side of the sheet, leaving a half inch of room for pressing closed.
      Add a small amount of filling ( 2 tbsp is a good estimate, but feel free to experiment until you've found an amount that will easily close but still makes a mouth full )
      Fold the skin over and press down hard to seal. use fork prongs if your fingers wont do the trick. or a dough cutter as a last resort.

     Now comes the easy part, Just steam them for 12 minutes. Once they're all steamed, break out a frying pan and coat liberally with oil. sprinkle in your preferred amount of black pepper and fry on both sides until golden brown. (I use a lot of pepper and fry 3 or 4 at a time. it only takes maybe a minute and a half for both sides to get done. )
     Be careful not to burn them. they will burn FAST with all that hot oil underneath them!

     As delicious as they are, don't forget to share. They're most fun eaten in groups.
Of course...that doesn't mean you shouldn't get the most!

December 2nd- No Bean Chili

     Its getting cold out these days, 20 degrees or lower most nights.
     Its time for Chili!!

     Ok now lets get this out of the way before anyone freaks out. I do not use beans in my chili.
Why? Cause beans are an abomination if you ask me. they're disgusting and I have never liked a bean in my life. I have tasted one bean dish I could stomach but I still wouldn't say I liked it. and so, travesty or not, there are no beans in my chili. if you're looking for beans, look elsewhere now.

     With that out of the way, back to the topic. This is one of my more normal recipes. There isn't really any twist to it. my girlfriend just asks me to cook it so often that I felt obliged to put it into my blog. It's just a well balanced, mildly spicy, very tasty chili. it's kind of basic really.
     Despite that I've got no doubt that most of you will love it given the chance. Its great on a cold night or after a hard days work. and it doesn't take much to fill you up.
     Usually I make about 3 lbs worth, but this time around I did 5, so that's the recipe I'll be using.

Here's what you'll need!

2 lbs 93% lean meat
3 lbs 86% lean meat
1 large onion (Diced tiny )
1/2 medium green bell pepper
1/2 medium red bell pepper
1 jalapeno (use a spicier pepper if you want it hot.)
4 tomatoes (I use several kinds depending on what's freshest at the moment. cluster tomatoes are my favorite)
12 to 16 oz can tomato paste ( I use 12 for 3 lbs of meat and forgot to get a bigger can for this recipe but it still came out fine. still 16 oz may be worth looking into.)
4 cloves garlic
1/2 tsp tumeric
1/2 tsp parsely
1/2 tsp sweet paprika
2 tsp red pepper flakes
2 tsp cayenne pepper
1 tsp garlic powder
2 tsp ginger
1 cup dark brown sugar
(a few dashes of salt to taste)

     wow, there are a lot of ingredients in this one. But no worries. If you're spice rack is small you can mess around with the ones you've got until you find a good tasting blend.
     Alright, now that we've got everything we need...

Lets get cooking!

1. Brown your meat slowly under low heat, this could take 30 minutes or longer. but dont turn the heat up and risk actually cooking the meat. keep your stove strictly to low-medium heat.
2. Once its all browned you want to strain out all the fat out of the meat. if you don't, in my opinion it gives the chili and almost spongy texture. But go for it if that's what you're into.
3. Dice up your onion finely and mix it into the meat. simmer the meat stirring occasionally until the onions become translucent.
4. Red and green bell peppers, and jalapeno go into the pot chopped at least as finely as the onion. Simmer those for 10 minutes as well. Add all your ground spices at this point as well.
5. add in your tomato paste and chopped tomato cubes. half a cup of brown sugar. mix everything in well and taste. Add a 4th cup of brown sugar at a time, tasting after mixing until you're satisfied with the sweetness. I find the full 1 cup works perfectly.
6. simply simmer for 2 and a half hours, stirring every 15 and draining out excess far if it rises to the top in the form of liquid.

     It takes a while and there are a lot of ingredients, but in the end chili isn't very hard to make. just have everything prepped in advance and you'll be enjoying a hot bowl on a cold night in no time. and no gross beans to mess up that beautiful tomato-meat flavor!

Not only that, but you'll have left overs for days, and it will only get better!

Tuesday, November 30, 2010

November 30th- Peanut Brittle Beer Bread

     The name sounds like a tongue twister, am I right?

     I'm a big fan of beer bread, and pretty damned good at making the normal stuff. but before I put a beer bread recipe up here I wanted to give it a twist. this is after all, a blog for only twisted recipes, weather they be only slightly twisted or in complete knots.

     A lot of people think about quick breads when beer bread comes to mind. and those are good but so easy to make that its almost insulting to do so and show it off.  You wont find many quick breads in the future of this blog, maybe one or two if I think of something really fun to do with them. otherwise absolutely none.
     Besides that, yeast breads are so much more practical and versatile than quick breads. so lets get down to business!

     The idea came to me today when I was trying to figure out how to make a better beer bread. what could I add? My normal beer bread already uses more than half wheat flour to enhance the taste of the beer (not my original idea, I admit. but I wouldn't have it any other way. )
     I needed a good idea of my own to put into this stuff. What -else- goes good with beer?
     Nuts. The famous beer-side snack of the bar scene.
     Good right? But I'm not done yet.
     I was at the local supermarket searching out ingredients, and then I saw them...a display case full of candy coated nuts. "Johnny Almond" to be exact.
     They had various flavors but in the end I chose peanut brittle coated almonds, and I had my twist!

Here's What You'll Need!

1/2 oz yeast
1 tbsp Sugar
1 12 oz beer (Sam Adams Boston Lager in my case)
2 1/2 cup wheat flour
1 3/4 cup bread flour
3 tbsp butter
2 tsp salt
2 eggs
1/3rd cup water
1 cup crushed candy coated nuts of your choice (peanut brittle almonds in my case)
2 tbsp olive oil

     Now we're all set so lets get cooking!
     First thing is you need to wake your yeast. To do this, add it to your 3rd of a cup of warm water and let sit for 5 minutes.
     In a seperate bowl add in most of your flour (reserve about a cup of the combined flour just in case it sucks up more than you would have thought. you can add it slowly that way and not dry out your dough. ) Add the sugar, salt, melted butter, nuts, and one egg. put the other aside for later.
     next comes your yeast, and then right after, the good stuff. dump in your beer of choice and start mixing with a large wooden spoon.
     Keep on mixing and adding the rest of the flour until a nice dough starts to pull together. then take over with your hands and knead it for 5 to 10 minutes on a well floured surface. ( I had to add in another 8th cup of each flour here, but that's what I get for not sifting first. You may or may not need to.)
     Once the dough is formed, put 2 tbsp of oil into a large bowl, and form the dough into a ball and give it a roll to coat. Set a towel over the bowl with the dough in it and let sit for an hour.

     Once the hour is up, dump the dough onto the counter and press the air out of it with a quick even knead, folding it once or twice. Get your dough cutter and cut it into 8 equal pieces. (16 if you want. they come out pretty big at 8, almost like kaiser rolls)
     A lot of people use corn starch for the next step, not sure why. I haven't actually ever had the corn starch around to try, but instead of that I give the dough balls a light coating of oil before covering them again and letting sit for 30 minutes.
     The oven goes up to 400 now, and when the half hour is up give them a quick egg wash with your remaining egg white. toss them in and keep em' there for 25 to 30 minutes. When they come out you'll have some big beautiful beer bread buns.
Just like these!!

     These turned out great.If there is anything to watch out for, its the slightly bitter taste that sugar can give off if it gets to burnt. a few bites came out like that for me, though the experience wasn't completely unpleasant. It reminded me of taking a quick sip of black coffee...
     Come to think of it, one of these with a cup of coffee would make an ideal early morning snack.

Thursday, November 25, 2010

Thanksgiving- Spring Honey Potato Salad


Its strange yet cool that my first post on this blog is thanksgiving day, but I cant think of a better starting date.
     My name is Mike and I love to cook. I'll write more about my in future posts, but for now I want to get right to my food. Here's whats up.

     I usually spend thanksgiving day at my grandmom's house. She cooks like crazy every holiday and puts out huge meals for the whole family.
     I went this year to, actually. So why did I put together a meal of magnitude once I got home?
     My girlfriend has Celiac, Which is an allergy to gluten, in things like bread and way more things than you would think. because of this, a good bit, but not all of my posts will probably be gluten free,
     As she has this allergy, she really cant come and eat with my family and me. And turkey being her favorite food, I had to do something.

     Meal : Pan-Seared Turkey, Grilled Onions, and Spring Honey Potato Salad

     First the Turkey
      My girlfriend is a turkey purist so I didnt do much in the way of unique flavors. Just a traditional turkey cooked on a hot skillet.

This is what you'll need!

3 Turkey Breads (About .90 lb total) 
Sesame oil to coat the pan
A few dashes of seseme seeds
a pinch of salt
a bit of parsley

     Toss the spices in right on top of the sizzling turkey, and cook on high until thoroughly done.
     After that, quickly slice up and onion into rings and throw it right into the delicious turkey juice. Cook until brown and soft. That takes care of the onion,
     One more dish to go.

     The Potato Salad!

     Despite the turkey usually being the highlight of thanksgiving, I kidn of thought of the potato salad as my main dish today. Probably because I'd never cooked potato salad at all before. Much less made something special out of it.
     This is what I call Spring Honey Potato Salad. And its probably the best I've ever had.
Here's what you'll need!

Honey Mayo-
     That's right. This recipe actually calls for you to make your own mayo. its a bit of a chore but it gives you al ot more options on any dish using it. This is the most important part so I'll start with it.

2 Egg yolks
5/6th cups of sunflour oil
Dash salt
Dash sugar
tsp lemon juice
1/2 tsp red pepper flakes
1/4th tsp cayenne pepper
1/4th tsp sesame seeds
1 to 2 tsp honey (It has a big impact. Add carefully.)


     Break out your egg yolks and put them in a mixing bowl with your sugar, salt and lemon juice. Put your mixer on slow (or your whisk hand on really really fast) and mix until smooth.
     Slowly drip in the oil as you continue to mix, making sure all the previous oil is absorbed before adding more.
     Once it's all been used up, check to make sure the consistancy is right. if it is watery add more oil and continue mixing untilyou have mayo consistancy. If its to solid, you mixed to much and may have to start over.
     Add the rest of the spices, mix briefly. Add the honey, mix once more.

Step 2 : The Actual Potatoes.

5 Skinned, Boiled, white potatoes (chopped bite sized but not microscopic )
1/3 white onion (Diced)
2 Boiled eggs
1/4 cup leek whites (Julienne)
2-3 dashes salt
2 cloves garlic (minced)
Honey Mayo to taste ( I used a bout a half of a cup, maybe a bit more.)

     Put the potatoes in the bowl, add everything else and mix well.
     If you dislike the acidic taste of raw onion you should lessen the mount of both onions and leeks accordingly. I actually put in a half onion and a half cup of leeks but some of my friends had trouble handling that much so I changed it on my blog.
     no appreciation for oniony bite *Sigh*
     (Potato salad keeps a week and a half, but I plan on finishing mine within 7 days to be safe )


     It was a good thanksgiving with two feasts instead of one.